In case of adults and children, some basic maneuvers help the victim breath well by opening the airway. Remember, these are done in case there’s breathing effort from the victim but you suspect airway obstruction preventing full entry of air into the lungs.
How to suspect airway obstruction?
You could hear snoring, gargling sounds or stridor while the victim is breathing.
Head-tilt-chin-lift and Jaw-thrust can help open the airway.
Head tilt – Chin lift

AVOID this if it’s a case of TRAUMA with possible neck bones fracture. (C-spine injury) You may use jaw thrust if needed.
***Trauma warning***
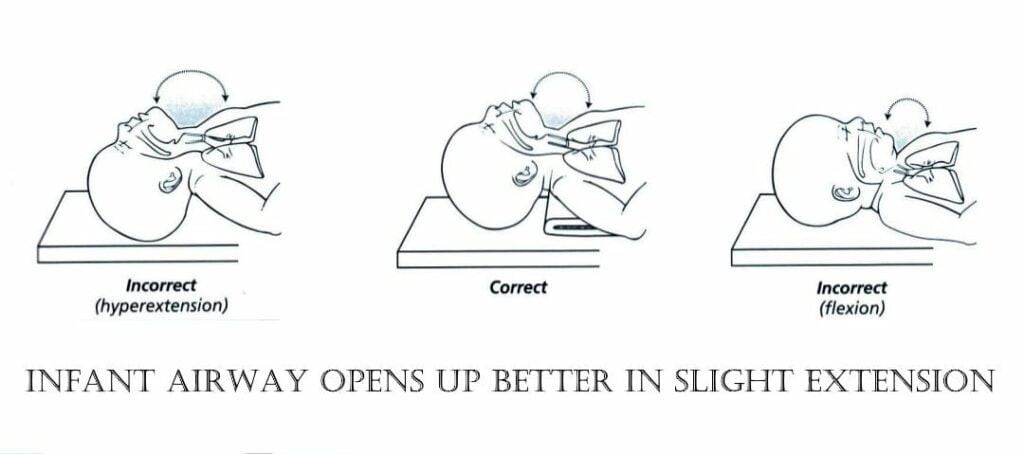
Infants have better opening of airway in neutral position. So Head tilt may not help in infants and it can be avoided.
Place a hand on the forehead, pushing it backwards and use the other hand fingers to elevate the chin. Make sure to place fingers on bony prominence of chin, not on soft tissue. If you press on soft tissue, the tongue will go back and obstruct the airway.
Jaw thrust
When someone is unconscious, the tongue falls back, blocking the airway. A simple jaw thrust could help pull the tongue forward and relieve the obstruction.
Stand at the head end of the patient. Using both hands on either side, pull the angles of the mandible forward, using cheek bones as support (fulcrum). Lips (mouth) should be open.

Breaths by rescuer
Rescue breaths if the breathing effort is lacking or inadequate.
Rescuer should provide breaths to victims using barrier devices or bag mask device.
If the breathing activity is inadequate, one should help with 1 breath every 2 to 3 seconds (20-30 breaths per minute). – The rescue breaths.
To compare, 1 rescue breath every 6 seconds (10 breaths per minute) in adults.
Breaths during CPR
If the breaths are given during CPR, give 2 breaths every 30 compressions for adults, irrespective of the number of rescuers.
For a child or infant, use 30:2 ratio (30 compressions : 2 breaths) for single rescuer BLS and 15:2 for two rescuer CPR
If there’s an advanced airway in place, give 1 breath every 2 to 3 seconds (20-30 breaths per minute).
Each breath should be delivered over 1 second, then wait for the air to come out of lungs for another second before attempting a second breath.
Barrier device
Instead of giving direct mouth-to-mouth breaths, using a barrier device such as a pocket mask with shield is preferred to reduce the chance of infection.
Some pocket masks have a provision to accept oxygen piping.
Most of the models have a 1-way valve which prevents the exhaled air or fluids from reaching the rescuer (inlet) port.
Select the right sized mask.
Place the mask over face covering both mouth and nose.
Rescuer should be located on the victim’s side.
Place the hand closest to head on the forehead (helps to do head tilt – caution: do not over-extend) and use the thumb and index finger to push the mask down to make a seal. Use the index and middle finger of other hand to do chin lift and use the thumb to push the mask down, sealing the lower end.
Take a deep breath and blow into the mask forcefully for 1 second till you see a visible chest rise.
After delivering a breath, move your face away and take another deep breath.
Repeat as needed.
Bag mask device

This is used from the head end. So, ideally, this is used when there are 2 people, one taking care of chest compressions and the other giving ventilations.
Connect the bag to an oxygen source if available.
Place the mask on the face, use your thumb and index finger on top of the mask like the alphabet “C”.
Use rest of the 3 finger like the alphabet “E” and elevate the angle of mandible.
Use the other hand to squeeze the bag till you see a chest rise.
Do not over ventilate – excess air you give will enter into stomach and might lead to regurgitation (vomit) of stomach contents leading to aspiration into lungs, which is dangerous.
Over ventilation also causes the chest pressures to increase and interferes with venous (blood) return to the heart.
If you have extra help available, one person can use both hands to secure the mask on either side and second person can squeeze the bag.